

How to Connect Yoast SEO plugin to Google Search Console? The Yoast SEO WordPress plugin helps you optimize your content for search engines, while Google Search Console gives you insights into how your site appears in Google results. Together, they make a powerful duo for improving your site’s visibility, fixing errors, and boosting organic traffic.
In this guide, you’ll learn how to connect Yoast SEO plugin to Google Search Console step by step. Whether you’re new to SEO or a WordPress user looking to enhance your website’s performance, this tutorial will walk you through the process in simple, clear language.
Why Connect Yoast SEO Plugin with Google Search Console?
Before we get into the setup, it’s important to understand why connecting Yoast SEO with Google Search Console matters.
The Yoast SEO plugin is widely known as one of the best SEO tools for WordPress. It helps you optimize keywords, manage meta descriptions, generate XML sitemaps, and handle technical SEO automatically. But to truly track your SEO progress, you need Google Search Console.
Here’s what happens when you connect both:
- You can verify your website ownership quickly using Yoast SEO WordPress plugin.
- You can submit your XML sitemap directly to Google.
- You’ll get valuable insights on which keywords your site ranks for.
- It helps you detect crawl issues, indexing errors, and site health problems.
- You can fix issues faster and improve ranking performance.
Simply put, Yoast SEO handles optimization, while Google Search Console handles analysis — together, they make your SEO strategy much more effective.
Step-by-Step Guide: How to Connect Yoast SEO Plugin to Google Search Console?
Let’s go through the process one step at a time.
Step 1: Install and Activate Yoast SEO Plugin
The first step is to make sure that the Yoast SEO WordPress plugin is installed and activated on your website.
- Go to your WordPress dashboard.
- Click on Plugins → Add New.
- In the search box, type Yoast Plugin.
- Click Install Now and then Activate.
Once installed, you’ll see a new Yoast SEO section in your WordPress sidebar.
Tip: The free version of Yoast SEO plugin is enough for connecting your site to Google Search Console.

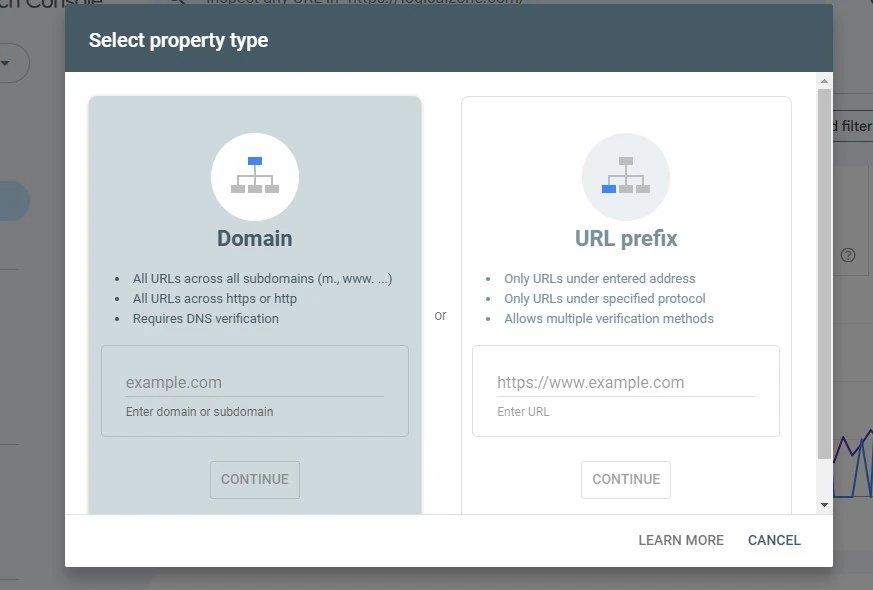
Step 2: Set Up Your Google Search Console Account
If you don’t have a Google Search Console account yet, you’ll need to create one.
- Visit https://search.google.com/search-console.
- Log in using your Google account.
- Click Add Property.
- Enter your website’s URL (make sure to include the correct version — with or without “www”).
- Click Continue.
Google will ask you to verify your ownership of the website. This is where Yoast SEO makes things easy.
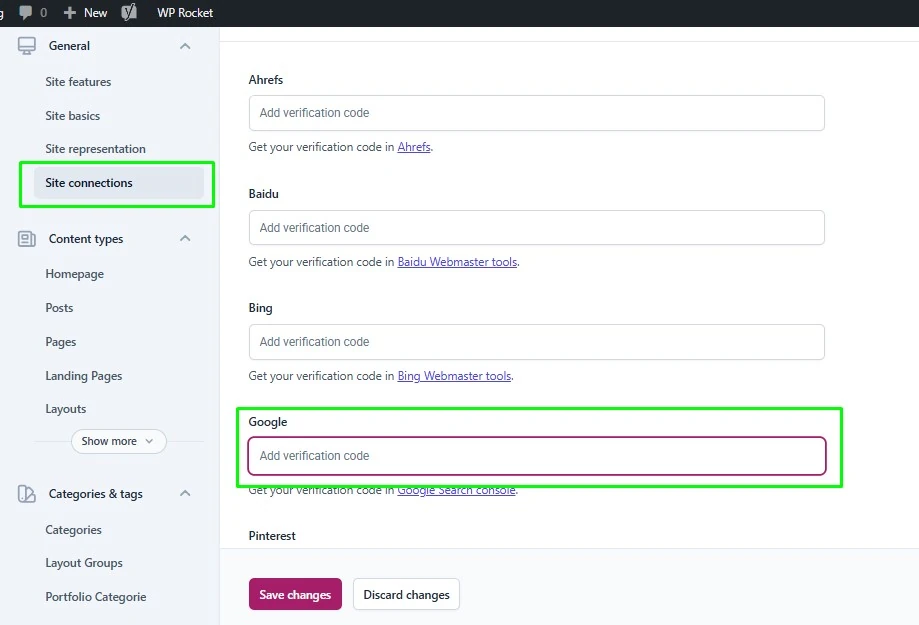
Step 3: Verify Site Ownership Through Yoast SEO
-
- In your Google Search Console, choose the HTML tag verification method.
- Copy the meta tag code provided by Google. It looks something like this: <meta name=”google-site-verification” content=”abc123xyz…” />
- Go to your WordPress dashboard.
- Navigate to Yoast SEO → Settings → Site connections.
- Under Google verification code, paste the content part of the meta tag (the code between the quotes).
- Click Save Changes.
Step 4: Submit Your XML Sitemap
-
- In your WordPress dashboard, go to Yoast SEO → Settings → Site features → XML sitemaps.
- Make sure the feature is turned on.
- Click View the XML sitemap. It will open a link like this: https://yourdomain.com/sitemap_index.xml
- Copy this link.
- Go to your Google Search Console dashboard.
- Click on Sitemaps in the left sidebar.
- Paste the sitemap URL and hit Submit.

Understanding What Happens After Connection
Once you’ve connected Yoast SEO plugin with Google Search Console, your website’s performance data will start appearing in your Search Console account.
You’ll be able to see:
- Search traffic and impressions for each page.
- Top performing keywords your site ranks for.
- Click-through rates (CTR) from search results.
- Crawl errors and indexing issues.
- Mobile usability and Core Web Vitals
This information is essential for improving your SEO strategy.
Use the data to make informed decisions — for example, update pages that have high impressions but low clicks, or fix broken links that affect rankings.
The Yoast SEO plugin ensures your technical SEO setup is correct, while Google Search Console helps you analyze performance.
Troubleshooting Common Issues
Sometimes, users face problems while trying to connect Yoast SEO plugin to Google Search Console. Here are some common fixes:
1. Verification Fails
If verification fails, double-check that you pasted the exact meta code from Google in the Yoast SEO verification field. Even a small mistake can cause an error.
2. Cached Pages
Sometimes, caching plugins or CDN services delay updates. Clear your website cache and try verifying again.
3. Wrong URL Format
Make sure you use the correct version of your domain — either https://www.yourdomain.com or https://yourdomain.com. Google treats them as separate properties.
4. Sitemap Errors
If your sitemap doesn’t load properly, check if your Yoast SEO plugin is up to date. Also, ensure that your WordPress permalink settings are not set to “Plain.”
Best Benefits to Connect Yoast SEO Plugin
When you link both tools, you unlock several SEO benefits:
- Better Keyword Insights
Track which search queries bring traffic to your site and optimize your pages accordingly. - Automatic Sitemap Management
The Yoast SEO plugin updates your sitemap automatically every time you publish or delete a page. - Faster Issue Detection
Identify broken links, crawl issues, and indexing problems quickly through Search Console alerts. - Improved SEO Performance
Combine Yoast SEO WordPress plugin recommendations with data from Google Search Console to refine your content strategy. - Enhanced Site Visibility
Ensure Google correctly understands your site’s structure and content. - Data-Driven Decisions
Make informed SEO adjustments based on accurate Google data rather than guesswork.
By connecting both, you get the best of both worlds — on-page optimization with Yoast SEO and performance tracking with Google Search Console.
Pro Tips After You Connect Yoast SEO Plugin
Once your site is connected, keep these best practices in mind:
- Monitor your performance Check for sudden drops in clicks or impressions.
- Review coverage reports to fix any “404 errors” or “excluded pages.”
- Optimize meta descriptions and titles suggested by the Yoast SEO plugin.
- Update content regularly to keep it relevant.
- Resubmit your sitemap after major website updates.
These ongoing efforts ensure your SEO setup stays strong and consistent.
Keeping Yoast SEO Updated
The Yoast SEO WordPress plugin updates frequently to stay aligned with Google’s changing algorithms. To get the most out of these updates, always use the latest version and connect Yoast SEO plugin with Google Search Console for full access to new features, bug fixes, and improved performance.
To update:
- Go to Dashboard → Updates in WordPress.
- If an update for Yoast SEO is available, click Update Now.
Keeping your Yoast SEO plugin current ensures seamless integration and accurate data reporting.
Final Thoughts: Make the Most of Yoast SEO and Google Search Console
Connecting the Yoast SEO plugin with Google Search Console is one of the most effective steps to improve your WordPress site’s SEO. When you connect Yoast SEO plugin to Google Search Console, you combine powerful on-page optimization tools with real-time search performance insights.
This integration helps you understand which keywords bring traffic, which pages need improvement, and how your site performs in Google search results. When you connect Yoast SEO plugin, you turn your website into a more search-friendly and data-driven platform.
If you want to grow your website and improve rankings, don’t skip this step. Set up Yoast SEO, link it with Google Search Console, and start making smarter SEO decisions for your site.